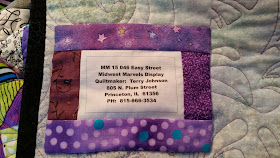
I make my labels on the computer. I write up the description of each quilt giving the pattern name, pattern designer, how the quilt was made i.e, hand or machine pieced, machine or hand quilted, name of quilter and where she is from, date finished. In this instance I also added what quilt show the quilt will be shown in. The more information you can give about the quilt just adds to its history.
Below I have created each label in a table on my word processing software. Each table has one row and one column. I center the writing with in the table. I leave about an inch in-between each label and then create another label. I have not figured out how to make two columns of tables on one page.
Therefore, the labels are on two pages. I print them out on paper first, check the spelling and information for accuracy. Then I load the fabric page in the printer and print one page, then turn the fabric page and print the second page on the opposite side. Please read your printer's instructions or practice with paper before doing this on your fabric page.
I let the ink dry. Then heat set it according to manufacturer's instructions. I do not rinse the fabric.
After peeling the fabric off the paper backing, I trim about 1/2 inch from lines.
Now I frame the label with fabric from the quilt.
Next I lay the label, right sides together on a piece of coordinating or matching fabric.
Stitch around label using scant 1/4 inch seam.
Make a small slit in the fabric backing side behind the where the framed part is. That way the slit will not show through from the front.
Clip the corners to reduce the bulk and turn right-side out through the slit.
Push out corners and seams to create a square label and press.
Now turn over the label and we have to close that slit. Notice that my slit is behind where the frame is. If you would put the slit behind where the label is, it might show through your white label.
I used a blanket stitch or button hole stitch to close the slit.
Now you can pin on your finished label and whip stitch or applique stitch your label onto your quilt's back. I find by using this method, I have a nice square label that is easy to read.
I would appreciate hearing from you about my tutorial. This is the first one I have written and would appreciate some feedback.
Today I am linking up with Connie at Freemotion by the River and A Quilt Story's Fabric Tuesday.
Yours in quilting,
Terry


Using Word? Under Page Layout choose 2 columns; it will automatically break. Or force a break by inserting a column break: Page Layout, Breaks, Column.
ReplyDeleteUsing Libre Office which is like Word. Thanks for your help, Libby.
DeleteClear and concise-thanks for the tutorial!
ReplyDeleteYou're welcome. Thanks for stopping by and leaving a comment. I love the feedback.
DeleteLove it. (I read it all the way through without knowing there would be a test at the end!)
ReplyDeleteI'm wondering how long the print will last. Should it be heat set? I want the label to last through lots of washings. What brand of printer fabric did you use?
Hugs
Thanks, Terry. The print seems to hold up well. I did recommend heat setting the ink. The only labels that I had fade terribly were baby quilts that were washed constantly and almost worn out. I had given that mother a printed paper copy of the labels (they were twins) to put in their scrapbooks.
DeleteI don't have the original label for the fabric I used the most to tell you the brand. The fabric in my tutorial is EQ Printables, premium cotton satin. It is labeled as best quality wearable-weight fabric so is meant to take wear and tear.
Very nice! I've done hand written labels this way, but my current favorite method is the triangle in a corner... saves on the hand stitching! :o))
ReplyDeleteI have done many hand written labels, also. Thank you for your comment.
DeleteVery easy to follow!!!
ReplyDeleteThanks for your feedback, Brenda. Have you thawed out down there?
DeleteVery easy to follow. Great pattern for a label.
ReplyDeleteJust found this tutorial. Found the steps easy to follow. Great tip about "word" doc!! Will try in the new year-2017!
ReplyDelete